Customizing ASP.NET Core Part 10: TagHelpers
Jürgen Gutsch - 13 November, 2018
Update 2021-02-01
This series is pretty much outdated!
As asked by a reader, I compiled the entire series into a book and updated the contents to the latest version of ASP.NET Core. This book is now ready to get ordered on Amazon:
Read here to learn more about the book

This was initially planned as the last topic of this series, because this also was the last part of the talk about customizing ASP.NET Core I did in the past. See the initial post about this series. Now I have three additional customizing topics to talk about. If you like to propose another topic feel free to drop a comment in the initial post.
In this tenth part of this series I'm going to write about TagHelpers. The built in TagHelpers are pretty useful and making the razor more pretty and more readable. Creating custom TagHelpers will make your life much easier.
This series topics
- Customizing ASP.NET Core Part 01: Logging
- Customizing ASP.NET Core Part 02: Configuration
- Customizing ASP.NET Core Part 03: Dependency Injection
- Customizing ASP.NET Core Part 04: HTTPS
- Customizing ASP.NET Core Part 05: HostedServices
- Customizing ASP.NET Core Part 06: Middlewares
- Customizing ASP.NET Core Part 07: OutputFormatter
- Customizing ASP.NET Core Part 08: ModelBinders
- Customizing ASP.NET Core Part 09: ActionFilter
- Customizing ASP.NET Core Part 10: TagHelpers - This article
- Customizing ASP.NET Core Part 11: WebHostBuilder
- customizing ASP.NET Core Part 12: Hosting
About TagHelpers
With TagHelpers you are able to extend existing HTML tags or to create new tags that get rendered on the server side. The extensions or the new tags are not visible in the browsers. TagHelpers a only kind of shortcuts to write easier and less HTML or Razor code on the server side. TagHelpers wil be interpreted on the server and will produce "real" HTML code for the browsers.
TagHelpers are not a new thing in ASP.NET Core, it was there since the first version of ASP.NET Core. The most existing and built-in TagHelpers are a replacement for the old fashioned HTML Helpers, which are still existing and working in ASP.NET Core to keep the Razor views compatible to ASP.NET Core.
A very basic example of extending HTML tags is the built in AnchorTagHelper:
<!-- old fashioned HtmlHelper -->
<li>@Html.Link("Home", "Index", "Home")</li>
<!-- new TagHelper -->
<li><a asp-controller="Home" asp-action="Index">Home</a></li>
The HtmlHelper are kinda strange between the HTML tags, for HTML developers. It is hard to read. It is kind of disturbing and interrupting while reading the code. It is maybe not for ASP.NET Core developers who are used to read that kind of code. But compared to the TagHelpers it is really ugly. The TagHelpers feel more natural and more like HTML even if they are not and even if they are getting rendered on the server.
Many of the HtmlHelper can be replaced with a TagHelper.
There are also some new tags built with TagHelpers. Tags that are not existing in HTML, but look like HTML. One example is the EnvironmentTagHelper:
<environment include="Development">
    <link rel="stylesheet" href="~/lib/bootstrap/dist/css/bootstrap.css" />
    <link rel="stylesheet" href="~/css/site.css" />
</environment>
<environment exclude="Development">
    <link rel="stylesheet" href="https://ajax.aspnetcdn.com/ajax/bootstrap/3.3.7/css/bootstrap.min.css"
            asp-fallback-href="~/lib/bootstrap/dist/css/bootstrap.min.css"
            asp-fallback-test-class="sr-only" asp-fallback-test-property="position" asp-fallback-test-value="absolute" />
    <link rel="stylesheet" href="~/css/site.min.css" asp-append-version="true" />
</environment>
This TagHelper renders or doesn't render the contents depending of the current runtime environment. In this case the target environment is the development mode. The first environment tag renders the contents if the current runtime environment is set to Development and the second one renders the contents if it not set to Development. This makes it a useful helper to render debugable scripts or styles in Development mode and minified and optimized code in any other runtime environment.
Creating custom TagHelpers
Just as a quick example, let's assume we need to have any tag configurable as bold and colored in a specific color:
<p strong color="red">Use this area to provide additional information.</p>
This looks like pretty old fashioned HTML out of the nineties, but this is just to demonstrate a simple TagHelper. But this can be done by a TagHelper that extend any tag that has an attribute called strong
[HtmlTargetElement(Attributes = "strong")]
public class StrongTagHelper : TagHelper
{
    public string Color { get; set; }

    public override void Process(TagHelperContext context, TagHelperOutput output)
    {
        output.Attributes.RemoveAll("strong");

        output.Attributes.Add("style", "font-weight:bold;");
        if (!String.IsNullOrWhiteSpace(Color))
        {
            output.Attributes.RemoveAll("style");
            output.Attributes.Add("style", $"font-weight:bold;color:{Color};");
        }
    }
}
The first line tells the tag helper to work on tags with an target attribute strong. This TagHelper doesn't define an own tag. But also provides an additional attribute to specify the color. At least the Process method defined how to render the HTML to the output stream. In this case it adds some CSS inline Styles to the current tag. It also removes the target attribute from the current tag. The color attribute won't show up.
This will look like this
<p color="red">Use this area to provide additional information.</p>
The next sample show how to define a custom tag using a TagHelper:
public class GreeterTagHelper : TagHelper
{
    [HtmlAttributeName("name")]
    public string Name { get; set; }

    public override void Process(TagHelperContext context, TagHelperOutput output)
    {
        output.TagName = "p";
        output.Content.SetContent($"Hello {Name}");
    }
}
This TagHelper handles a greeter tag that has a property name. In the Process method the current tag will be changed to a p tag and the new content is set the the current output.
<greeter name="Readers"></greeter>
The result is like this:
<p>Hello Readers</p>
A more complex scenario
The TagHelpers in the last section were pretty basic just to show how TagHelpers work. The next sample is a little more complex and shows an almost real scenario. This TagHelper renders a table with a list of items. This is a generic TagHelper and shows a real reason to create own custom TagHelpers. With this you are able to reuse an a isolated piece of view code. You can wrap for example Bootstrap components to make it much easier to use, e.g. with just one tag instead of nesting five levels of div tags. Or you can just simplify your Razor views:
public class DataGridTagHelper : TagHelper
{
    [HtmlAttributeName("Items")]
    public IEnumerable<object> Items { get; set; }

    public override void Process(TagHelperContext context, TagHelperOutput output)
    {
        output.TagName = "table";
        output.Attributes.Add("class", "table");
        var props = GetItemProperties();

        TableHeader(output, props);
        TableBody(output, props);
    }

    private void TableHeader(TagHelperOutput output, PropertyInfo[] props)
    {
        output.Content.AppendHtml("<thead>");
        output.Content.AppendHtml("<tr>");
        foreach (var prop in props)
        {
            var name = GetPropertyName(prop);
            output.Content.AppendHtml($"<th>{name}</th>");
        }
        output.Content.AppendHtml("</tr>");
        output.Content.AppendHtml("</thead>");
    }

    private void TableBody(TagHelperOutput output, PropertyInfo[] props)
    {
        output.Content.AppendHtml("<tbody>");
        foreach (var item in Items)
        {
            output.Content.AppendHtml("<tr>");
            foreach (var prop in props)
            {
                var value = GetPropertyValue(prop, item);
                output.Content.AppendHtml($"<td>{value}</td>");
            }
            output.Content.AppendHtml("</tr>");
        }
        output.Content.AppendHtml("</tbody>");
    }

    private PropertyInfo[] GetItemProperties()
    {
        var listType = Items.GetType();
        Type itemType;
        if (listType.IsGenericType)
        {
            itemType = listType.GetGenericArguments().First();
            return itemType.GetProperties(BindingFlags.Public | BindingFlags.Instance);
        }
        return new PropertyInfo[] { };
    }

    private string GetPropertyName(PropertyInfo property)
    {
        var attribute = property.GetCustomAttribute<DisplayNameAttribute>();
        if (attribute != null)
        {
            return attribute.DisplayName;
        }
        return property.Name;
    }

    private object GetPropertyValue(PropertyInfo property, object instance)
    {
        return property.GetValue(instance);
    }
}
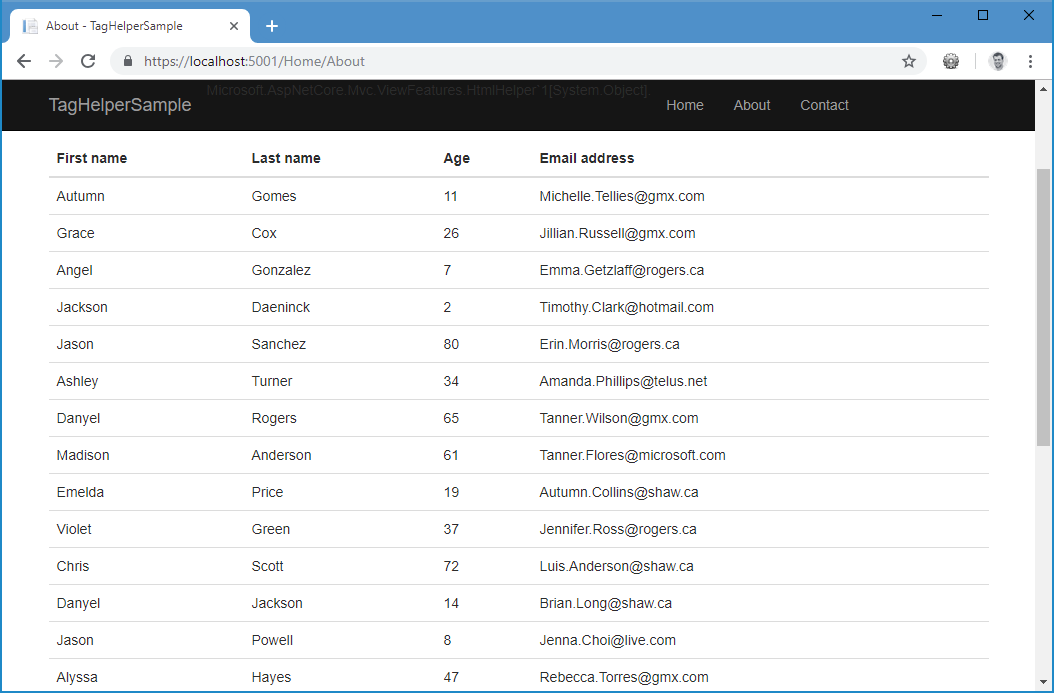
To use this TagHelper you just need to assign a list of items to this tag:
<data-grid persons="Model.Persons"></data-grid>
In this case it is a list of persons, that we get in the Persons property of our current model. The Person class I use here looks like this:
public class Person
{
    [DisplayName("First name")]
    public string FirstName { get; set; }

    [DisplayName("Last name")]
    public string LastName { get; set; }

    public int Age { get; set; }

    [DisplayName("Email address")]
    public string EmailAddress { get; set; }
}
So not all of the properties have a DisplayNameAttribute, so the fallback in the GetPropertyName method is needed to get the actual property name instead of the the DisplayName value.
To use it in production this TagHelper need some more checks and validations, but it works:
Now you are able to extend this TagHelper with a lot more features, like sorting, filtering, paging and so on. Feel free.
Conclusion
TagHelpers are pretty useful to reuse parts of the view and to simplify and cleanup your views. You can also provide a library with useful view elements. Here are some more examples of already existing TabHelper libraries and samples:
- https://github.com/DamianEdwards/TagHelperPack
- https://github.com/dpaquette/TagHelperSamples
- https://www.red-gate.com/simple-talk/dotnet/asp-net/asp-net-core-tag-helpers-bootstrap/
- https://www.jqwidgets.com/asp.net-core-mvc-tag-helpers/
This part was initially planned as the last part of this series, but I found some more interesting topics. If you also have some nice ideas to write about feel free to drop a comment in the introduction post of this series.
In the next post, I'm going to write about how to customize the Hosting of ASP.NET Core Wep Applications: Customizing ASP.NET Core Part 11: Hosting (not yet done)