Customizing ASP.NET Core Part 07: OutputFormatter
Jürgen Gutsch - 11 October, 2018
Update 2021-02-01
This series is pretty much outdated!
As asked by a reader, I compiled the entire series into a book and updated the contents to the latest version of ASP.NET Core. This book is now ready to get ordered on Amazon:
Read here to learn more about the book

In this seventh post I want to write about, how to send your Data in different formats and types to the client. By default the ASP.NET Core Web API sends the data as JSON, but there are some more ways to send the data.
The series topics
- Customizing ASP.NET Core Part 01: Logging
- Customizing ASP.NET Core Part 02: Configuration
- Customizing ASP.NET Core Part 03: Dependency Injection
- Customizing ASP.NET Core Part 04: HTTPS
- Customizing ASP.NET Core Part 05: HostedServices
- Customizing ASP.NET Core Part 06: Middleswares
- Customizing ASP.NET Core Part 07: OutputFormatter - This article
- Customizing ASP.NET Core Part 08: ModelBinders
- Customizing ASP.NET Core Part 09: ActionFilter
- Customizing ASP.NET Core Part 10: TagHelpers
- Customizing ASP.NET Core Part 11: WebHostBuilder
- customizing ASP.NET Core Part 12: Hosting
About OutputFormatters
OutputFormatters are classes that turn your data into a different format to sent them trough HTTP to the clients. Web API uses a default OutputFormatter to turn objects into JSON, which is the default format to send data in a structured way. Other build in formatters are a XML formatter and a plan text formatter.
With the - so called - content negotiation the client is able to decide which format he wants to retrieve .The client need to specify the content type of the format in the Accept-Header. The content negotiation is implemented in the ObjectResult.
By default the Web API always returns JSON, even if you accept text/xml in the header. This is why the build in XML formatter is not registered by default. There are two ways to add a XmlSerializerOutputFormatter to ASP.NET Core:
services.AddMvc()
    .AddXmlSerializerFormatters();
or
services.AddMvc(options =>
{
    options.OutputFormatters.Add(new XmlSerializerOutputFormatter());
});
There is also a XmlDataContractSerializerOutputFormatter available
Also any Accept header gets turned into application/json. If you want to allow the clients to accept different headers, you need to switch that translation off:
services.AddMvc(options =>
{
    options.RespectBrowserAcceptHeader = true; // false by default
});
To try the formatters let's setup a small test project.
Prepare a test project
Using the console we will create a small ASP.NET Core Web API project. Execute the following commands line by line:
dotnet new webapi -n WebApiTest -o WebApiTest
cd WebApiTest
dotnet add package GenFu
dotnet add package CsvHelper
This creates a new Web API projects and adds two NuGet packages to it. GenFu is a awesome library to easily create test data. The second one helps us to easily write CSV data.
Now open the project in Visual Studio or in Visual Studio Code and open the ValuesController.cs and change the Get() method like this:
[HttpGet]
public ActionResult<IEnumerable<Person>> Get()
{
	var persons = A.ListOf<Person>(25);
	return persons;
}
This crates a list of 25 Persons using GenFu. The properties get automatically filled with almost realistic data. You'll see the magic of GenFu and the results later on.
In the Models folder create a new file Person.cs with the the Person class inside:
public class Person
{
    public int Id { get; set; }
    public string FirstName { get; set; }
    public string LastName { get; set; }
    public int Age { get; set; }
    public string EmailAddress { get; set; }
    public string Address { get; set; }
    public string City { get; set; }
    public string Phone { get; set; }
}
Open the Startup.cs as well and add the Xml formatters and allow other accept headers as described earlier:
services.AddMvc(options =>
{
    options.RespectBrowserAcceptHeader = true; // false by default
    options.OutputFormatters.Add(new XmlSerializerOutputFormatter());
});
That's it for now. Now you are able to retrieve the data from the Web API. Start the project by using the dotnet run command.
The best tools to test a web API are Fiddler or Postman. I prefer Postman because it is easy to use. At the end it doesn't matter which tool you want to use. In this demos I'm going to use Postman.
Inside Postman I create a new request. I write the API Url into the address field, which is https://localhost:5001/api/values and I add a header with the key Accept and the Value application/json.
After I press send I will see the JSON result in the response body below:
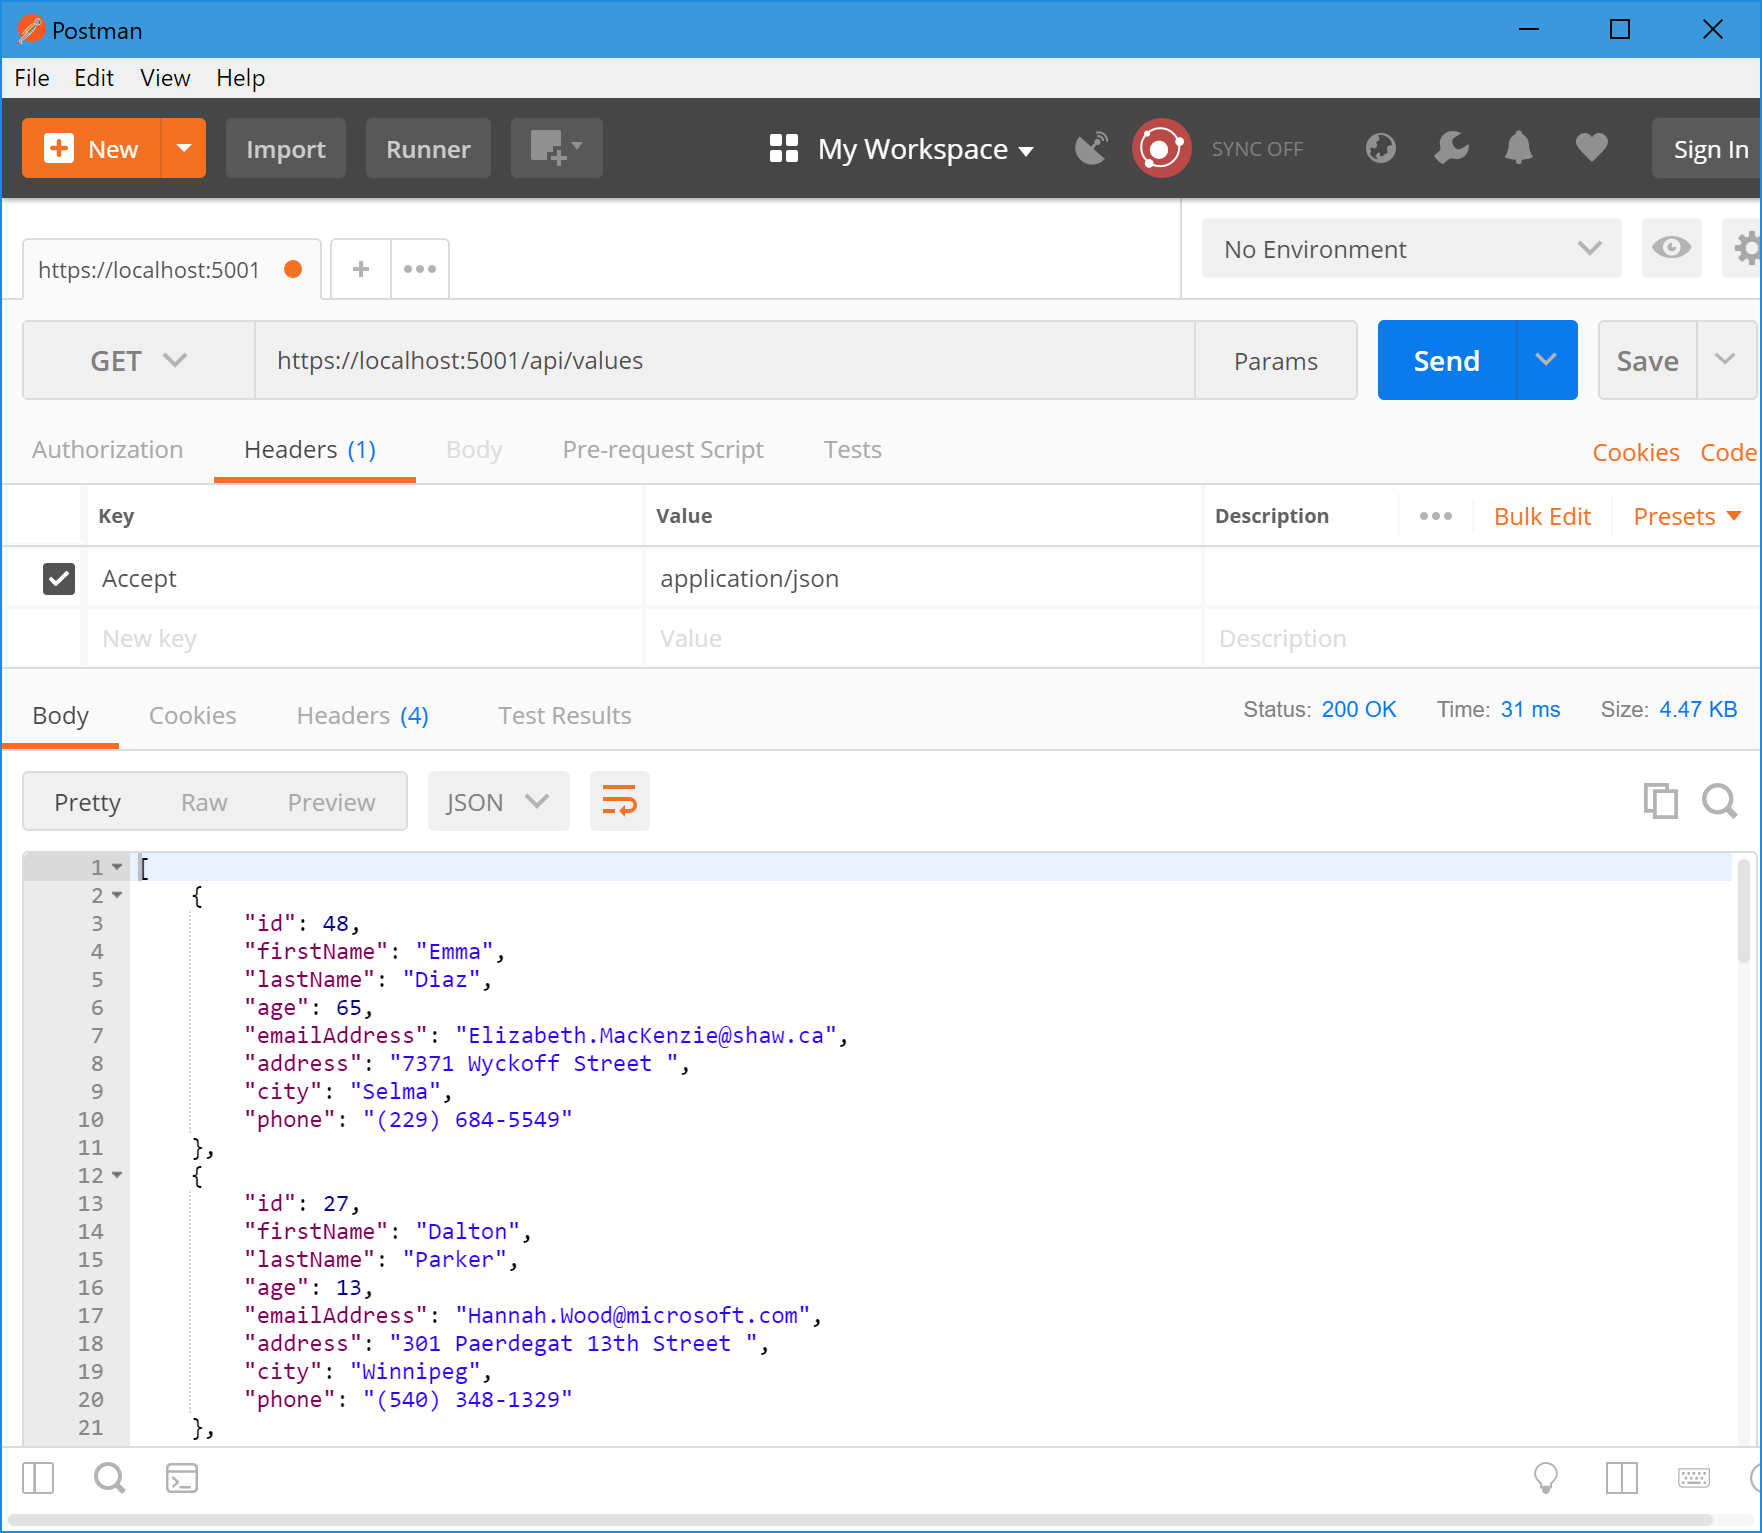
Here you can see the auto generated values. GenFu puts the data in based on the property type and the property name. So it puts real first names and real last names as well as real cities and phone numbers into the Persons properties.
No let's test the XML output formatter.
In postman change the Accept header form application/json to text/xml and press send:
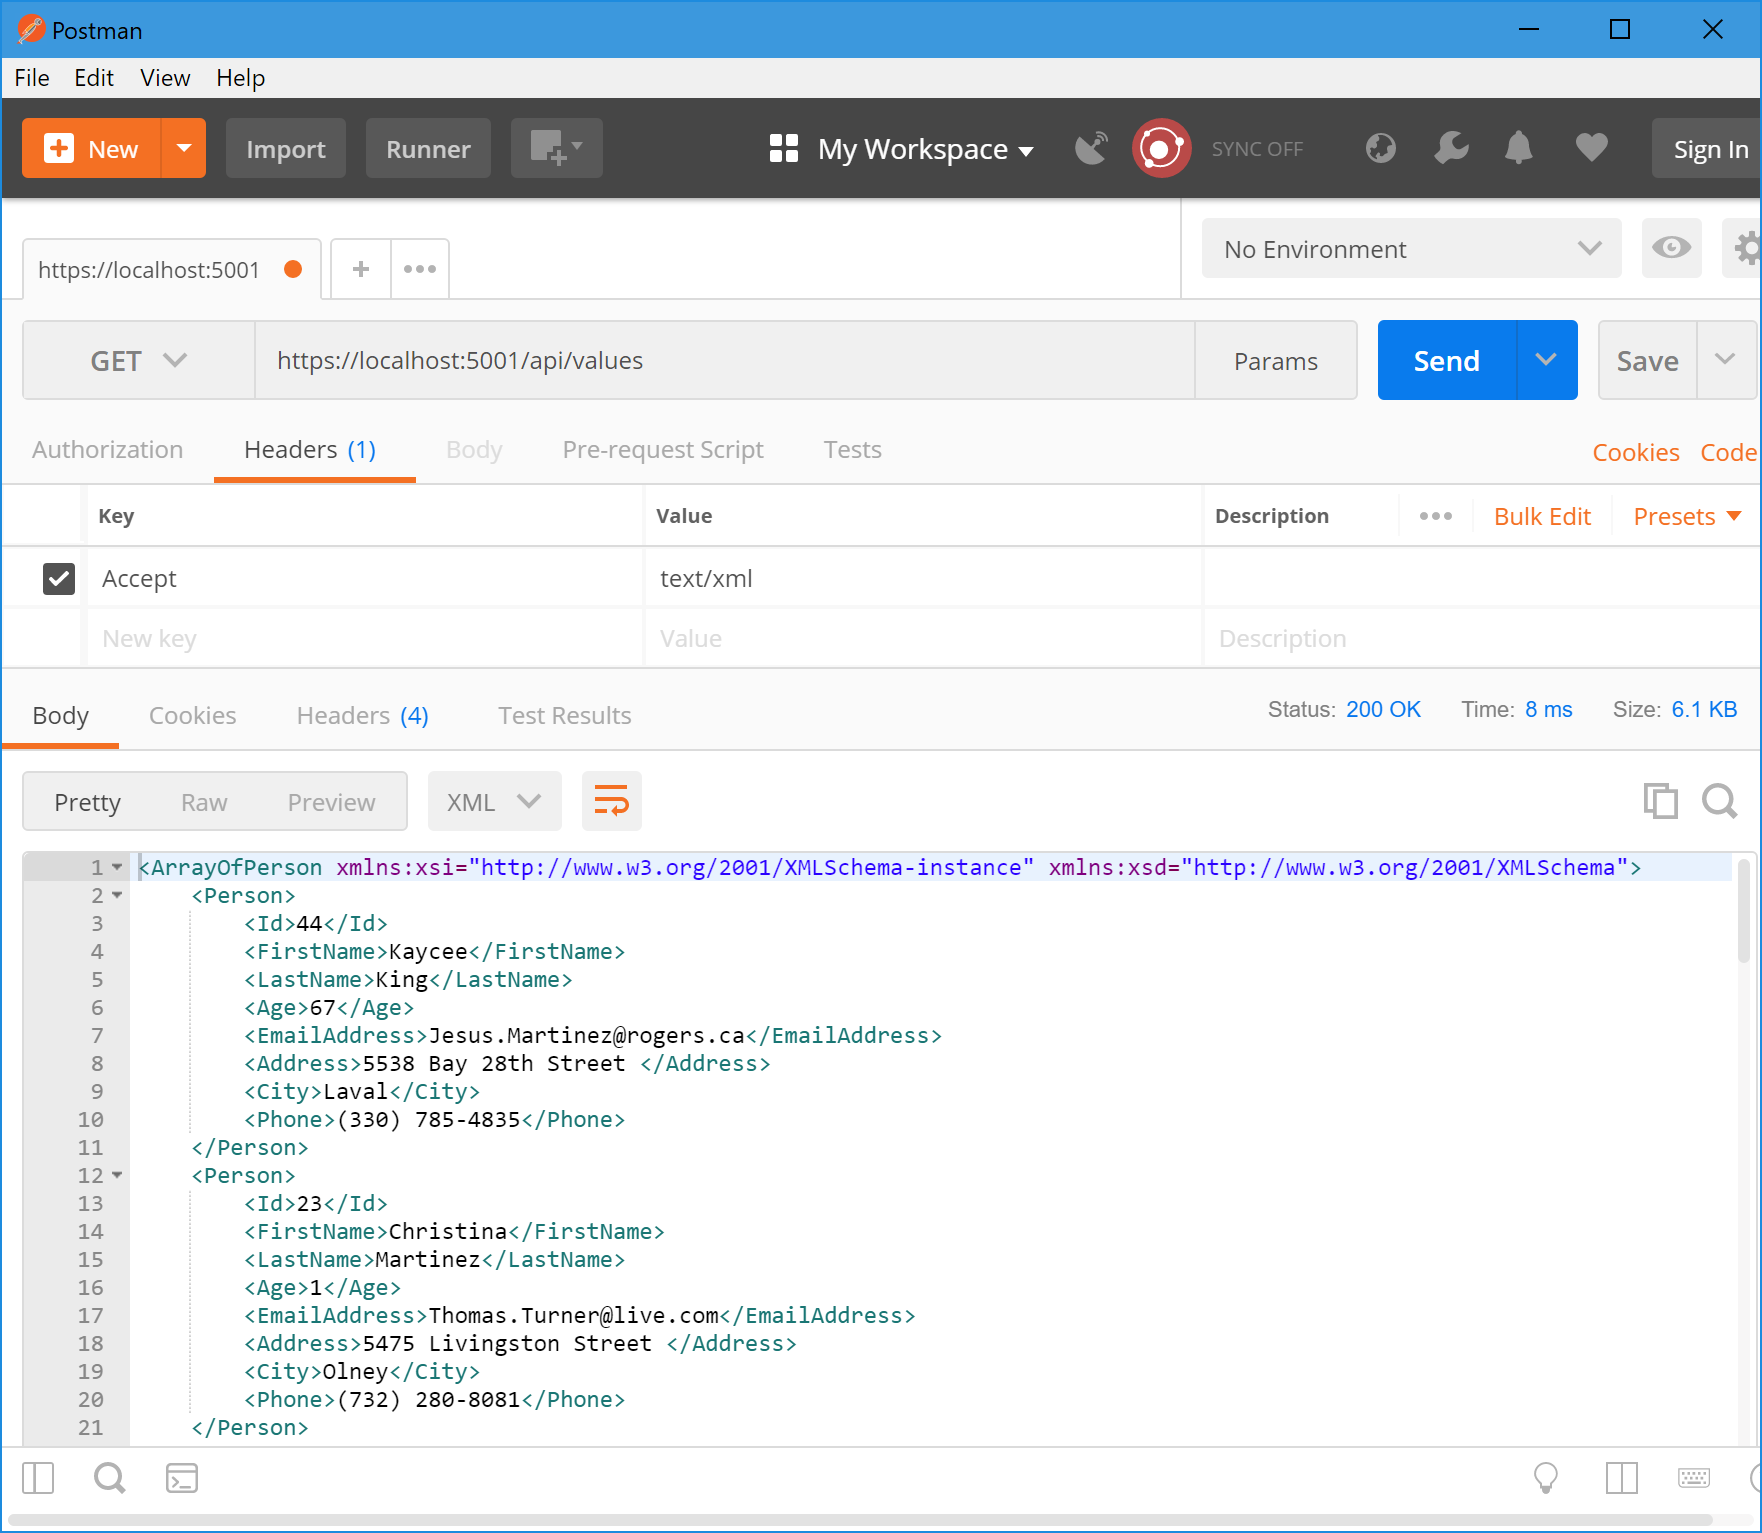
We now have an XML formatted output.
Now let's go a step further and create some custom OutputFormatters.
Custom OutputFormatters
The plan is to create an VCard output to be able to import the persons contacts directly to outlook or any other contact database that supports VCards. Later in this section we also want to create an CSV output formatter.
Both are text based output formatters and will derive from TextOutputFormatter. Create a new class in a new file called VcardOutputFormatter.cs:
public class VcardOutputFormatter : TextOutputFormatter
{
    public string ContentType { get; }

    public VcardOutputFormatter()
    {
        SupportedMediaTypes.Add(MediaTypeHeaderValue.Parse("text/vcard"));

        SupportedEncodings.Add(Encoding.UTF8);
        SupportedEncodings.Add(Encoding.Unicode);
    }

    // optional, but makes sense to restrict to a specific condition
    protected override bool CanWriteType(Type type)
    {
        if (typeof(Person).IsAssignableFrom(type)
            || typeof(IEnumerable<Person>).IsAssignableFrom(type))
        {
            return base.CanWriteType(type);
        }
        return false;
    }

    // this needs to be overwritten
    public override Task WriteResponseBodyAsync(OutputFormatterWriteContext context, Encoding selectedEncoding)
    {
        var serviceProvider = context.HttpContext.RequestServices;
        var logger = serviceProvider.GetService(typeof(ILogger<VcardOutputFormatter>)) as ILogger;

        var response = context.HttpContext.Response;

        var buffer = new StringBuilder();
        if (context.Object is IEnumerable<Person>)
        {
            foreach (var person in context.Object as IEnumerable<Person>)
            {
                FormatVcard(buffer, person, logger);
            }
        }
        else
        {
            var person = context.Object as Person;
            FormatVcard(buffer, person, logger);
        }
        return response.WriteAsync(buffer.ToString());
    }

    private static void FormatVcard(StringBuilder buffer, Person person, ILogger logger)
    {
		buffer.AppendLine("BEGIN:VCARD");
		buffer.AppendLine("VERSION:2.1");
		buffer.AppendLine($"FN:{person.FirstName} {person.LastName}");
		buffer.AppendLine($"N:{person.LastName};{person.FirstName}");
		buffer.AppendLine($"EMAIL:{person.EmailAddress}");
		buffer.AppendLine($"TEL;TYPE=VOICE,HOME:{person.Phone}");
		buffer.AppendLine($"ADR;TYPE=home:;;{person.Address};{person.City}");
		buffer.AppendLine($"UID:{person.Id}");
		buffer.AppendLine("END:VCARD");
		logger.LogInformation($"Writing {person.FirstName} {person.LastName}");
    }
}
In the constructor we need to specify the supported media types and encodings. In the method CanWriteType() we need to check whether the current type is supported within this output formatters. Here we only want to format a single Person or a lists of Persons.
The method WriteResponseBodyAsync() then actually writes the list of persons out to the response stream via a StringBuilder
At least we need to register the new VcardOutputFormatter in the Startup.cs:
services.AddMvc(options =>
{
    options.RespectBrowserAcceptHeader = true; // false by default
    options.OutputFormatters.Add(new XmlSerializerOutputFormatter());

    // register the VcardOutputFormatter
    options.OutputFormatters.Add(new VcardOutputFormatter());
});
Start the app again using dotnet run. Now change the Accept header to text/vcard and let's see what happens:
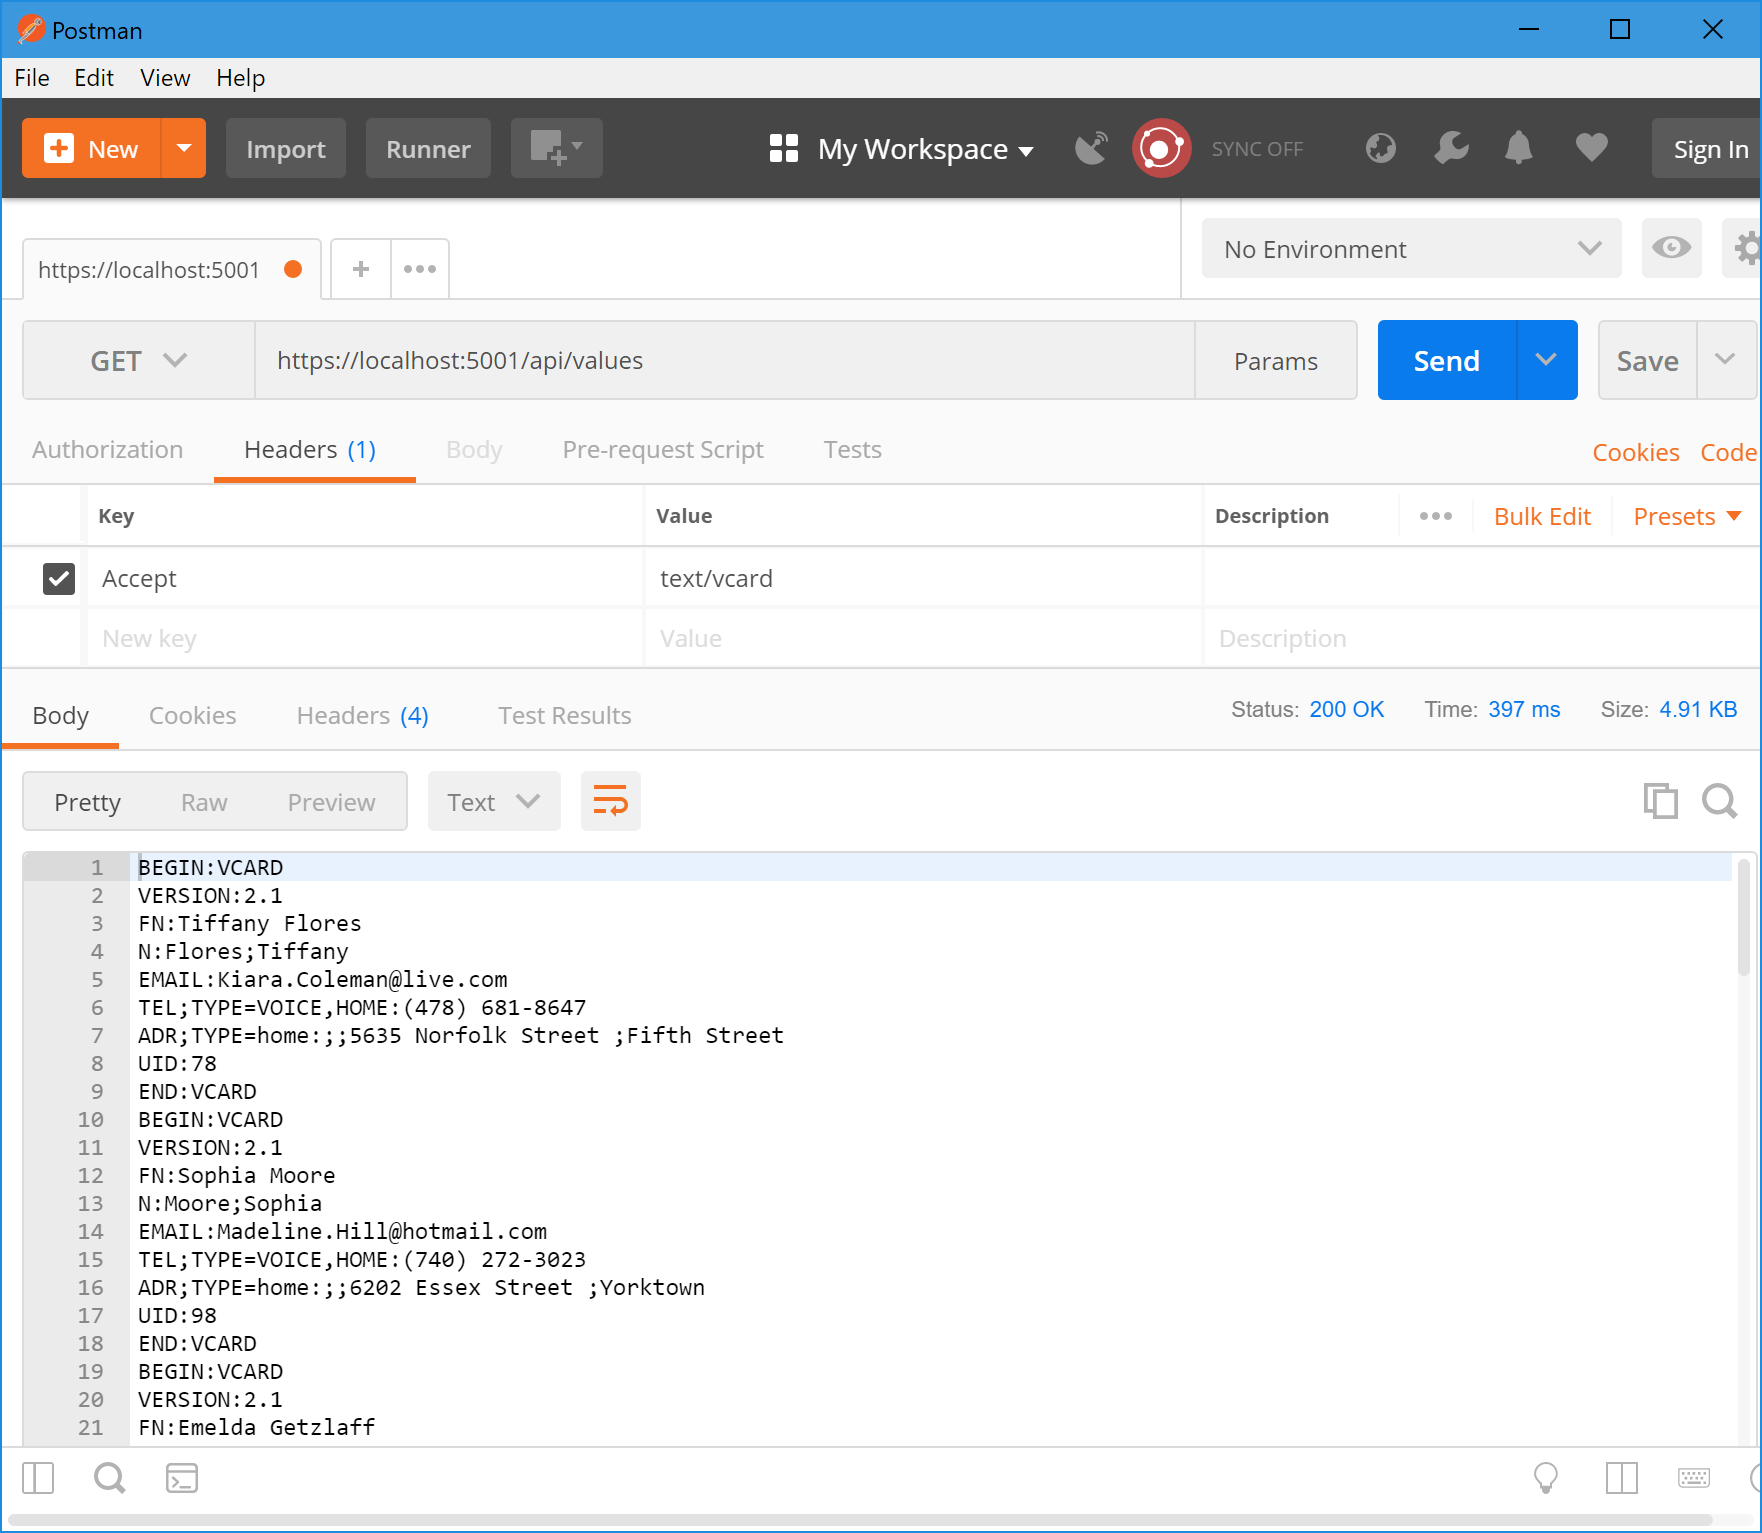
We now should see our date in the VCard format.
Let's do the same for a CSV output. We already added the CsvHelper library to the project, so you can just copy the next snippet into your project:
public class CsvOutputFormatter : TextOutputFormatter
{
    public string ContentType { get; }

    public CsvOutputFormatter()
    {
        SupportedMediaTypes.Add(MediaTypeHeaderValue.Parse("text/csv"));

        SupportedEncodings.Add(Encoding.UTF8);
        SupportedEncodings.Add(Encoding.Unicode);
    }

    // optional, but makes sense to restrict to a specific condition
    protected override bool CanWriteType(Type type)
    {
        if (typeof(Person).IsAssignableFrom(type)
            || typeof(IEnumerable<Person>).IsAssignableFrom(type))
        {
            return base.CanWriteType(type);
        }
        return false;
    }

    // this needs to be overwritten
    public override Task WriteResponseBodyAsync(OutputFormatterWriteContext context, Encoding selectedEncoding)
    {
        var serviceProvider = context.HttpContext.RequestServices;
        var logger = serviceProvider.GetService(typeof(ILogger<CsvOutputFormatter>)) as ILogger;

        var response = context.HttpContext.Response;

        var csv = new CsvWriter(new StreamWriter(response.Body));

        if (context.Object is IEnumerable<Person>)
        {
            var persons = context.Object as IEnumerable<Person>;
            csv.WriteRecords(persons);
        }
        else
        {
            var person = context.Object as Person;
            csv.WriteRecord<Person>(person);
        }

        return Task.CompletedTask;
    }
}
This almost works the same way. We can pass the response stream via a StreamWriter directly into the CsvWriter. After that we are able to feed the writer with the persons or the list of persons. That's it.
We also need to register the CsvOutputFormatter before we can test it.
services.AddMvc(options =>
{
    options.RespectBrowserAcceptHeader = true; // false by default
    options.OutputFormatters.Add(new XmlSerializerOutputFormatter());

    // register the VcardOutputFormatter
    options.OutputFormatters.Add(new VcardOutputFormatter());
	// register the CsvOutputFormatter
    options.OutputFormatters.Add(new CsvOutputFormatter());
});
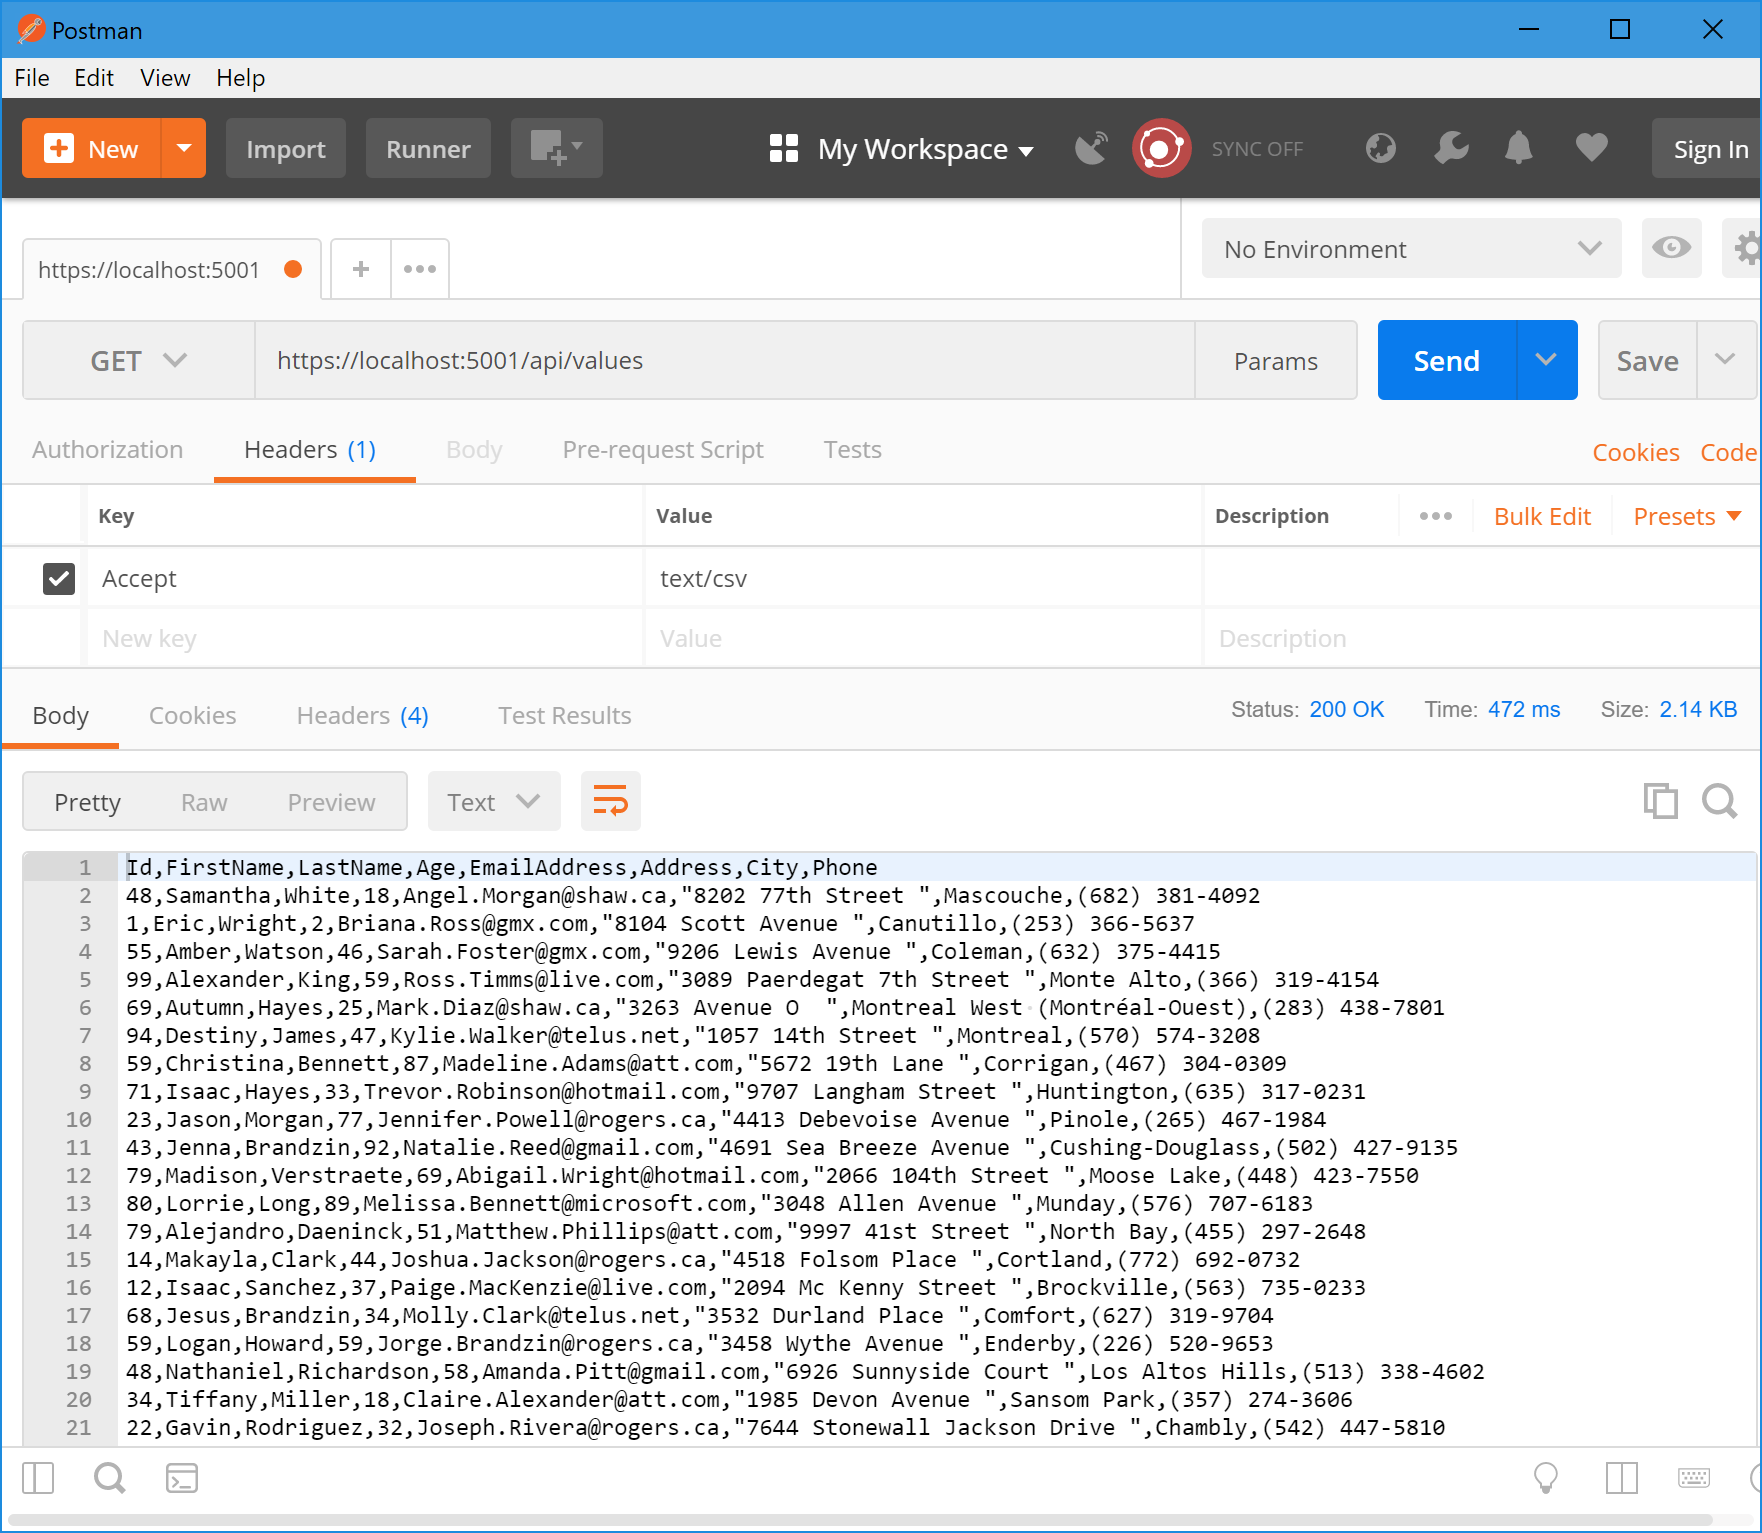
In Postman change the Accept header to text/csv and press send again:
Conclusion
Isn't that cool? I really like the way to change the format based on the except header. This way you are able to create an Web API for many different clients and that accept many different formats. There are still a lot of potential clients outside which don't use JSON and prefer XML or CSV.
The other way around would be an option to consume CSV or any other format inside the Web API. Let's assume your client would send you a list of persons in CSV format. How would you solve this? Parsing the String manually in the action method would work, but it's not a nice option. This is what ModelBinders can do for us. Let's see how this works in the next chapter about Customizing ASP.NET Core Part 08: ModelBinders.