Creating a chat application using React and ASP.NET Core - Part 5
Jürgen Gutsch - 06 March, 2018
In this blog series, I'm going to create a small chat application using React and ASP.NET Core, to learn more about React and to learn how React behaves in an ASP.NET Core project during development and deployment. This Series is divided into 5 parts, which should cover all relevant topics:
- React Chat Part 1: Requirements & Setup
- React Chat Part 2: Creating the UI & React Components
- React Chat Part 3: Adding Websockets using SignalR
- React Chat Part 4: Authentication & Storage
- React Chat Part 5: Deployment to Azure
I also set-up a GitHub repository where you can follow the project: https://github.com/JuergenGutsch/react-chat-demo. Feel free to share your ideas about that topic in the comments below or in issues on GitHub. Because I'm still learning React, please tell me about significant and conceptual errors, by dropping a comment or by creating an Issue on GitHub. Thanks.
Intro
In this post I will write about the deployment of the app to Azure App Services. I will use CAKE to build pack and deploy the apps, both the identity server and the actual app. I will run the build an AppVeyor, which is a free build server for open source projects and works great for projects hosted on GitHub.
I'll not go deep into the AppVeyor configuration, the important topics are cake and azure and the app itself.
BTW: SignalR was going into the next version the last weeks. It is not longer alpha. The current version is 1.0.0-preview1-final. I updated the version in the package.json and in the
ReactChatDemo.csproj. Also the NPM package name changed from "@aspnet/signalr-client" to "@aspnet/signalr". I needed to update the import statement in theWebsocketService.tsfile as well. After updating SignalR I got some small breaking changes, which are easily fixed. (Please see the GitHub repo, to learn about the changes.)
Setup CAKE
CAKE is a build DSL, that is built on top of Roslyn to use C#. CAKE is open source and has a huge community, who creates a ton of add-ins for it. It also has a lot of built-in features.
Setting up CAKE is easily done. Just open the PowerShell and cd to the solution folder. Now you need to load a PowerShell script that bootstraps the CAKE build and loads more dependencies if needed.
Invoke-WebRequest https://cakebuild.net/download/bootstrapper/windows -OutFile build.ps1
Later on, you need to run the build.ps1 to start your build script. Now the Setup is complete and I can start to create the actual build script.
I created a new file called build.cake. To edit the file it makes sense to use Visual Studio Code, because @code also has IntelliSense. In Visual Studio 2017 you only have syntax highlighting. Currently I don't know an add-in for VS to enable IntelliSense.
My starting point for every new build script is, the simple example from the quick start demo:
var target = Argument("target", "Default");

Task("Default")
  .Does(() =>
  {
    Information("Hello World!");
  });

RunTarget(target);
The script then gets started by calling the build.ps1 in a PowerShell
.\build.ps1
If this is working I'm able to start hacking the CAKE script in. Usually the build steps I use looks like this.
- Cleaning the workspace
- Restoring the packages
- Building the solution
- Running unit tests
- Publishing the app
- In the context of non-web application this means packaging the app
- Deploying the app
To deploy the App I use the CAKE Kudu client add-in and I need to pass in some Azure App Service credentials. You get this credentials, by downloading the publish profile from the Azure App Service. You can just copy the credentials out of the file. Be careful and don't save the secrets in the file. I usually store them in environment variables and read them from there. Because I have two apps (the actual chat app and the identity server) I need to do it twice:
#addin nuget:?package=Cake.Kudu.Client

string  baseUriApp     = EnvironmentVariable("KUDU_CLIENT_BASEURI_APP"),
        userNameApp    = EnvironmentVariable("KUDU_CLIENT_USERNAME_APP"),
        passwordApp    = EnvironmentVariable("KUDU_CLIENT_PASSWORD_APP"),
        baseUriIdent   = EnvironmentVariable("KUDU_CLIENT_BASEURI_IDENT"),
        userNameIdent  = EnvironmentVariable("KUDU_CLIENT_USERNAME_IDENT"),
        passwordIdent  = EnvironmentVariable("KUDU_CLIENT_PASSWORD_IDENT");;

var target = Argument("target", "Default");

Task("Clean")
    .Does(() =>
          {
              DotNetCoreClean("./react-chat-demo.sln");
              CleanDirectory("./publish/");
          });

Task("Restore")
	.IsDependentOn("Clean")
	.Does(() =>
          {
              DotNetCoreRestore("./react-chat-demo.sln");
          });

Task("Build")
	.IsDependentOn("Restore")
	.Does(() =>
          {
              var settings = new DotNetCoreBuildSettings
              {
                  NoRestore = true,
                  Configuration = "Release"
              };
              DotNetCoreBuild("./react-chat-demo.sln", settings);
          });

Task("Test")
	.IsDependentOn("Build")
	.Does(() =>
          {
              var settings = new DotNetCoreTestSettings
              {
                  NoBuild = true,
                  Configuration = "Release",
                  NoRestore = true
              };
              var testProjects = GetFiles("./**/*.Tests.csproj");
              foreach(var project in testProjects)
              {
                  DotNetCoreTest(project.FullPath, settings);
              }
          });

Task("Publish")
	.IsDependentOn("Test")
	.Does(() =>
          {
              var settings = new DotNetCorePublishSettings
              {
                  Configuration = "Release",
                  OutputDirectory = "./publish/ReactChatDemo/",
                  NoRestore = true
              };
              DotNetCorePublish("./ReactChatDemo/ReactChatDemo.csproj", settings);
              settings.OutputDirectory = "./publish/ReactChatDemoIdentities/";
              DotNetCorePublish("./ReactChatDemoIdentities/ReactChatDemoIdentities.csproj", settings);
          });

Task("Deploy")
	.IsDependentOn("Publish")
	.Does(() =>
          {
              var kuduClient = KuduClient(
                  baseUriApp,
                  userNameApp,
                  passwordApp);
              var sourceDirectoryPath = "./publish/ReactChatDemo/";
              var remoteDirectoryPath = "/site/wwwroot/";

              kuduClient.ZipUploadDirectory(
                  sourceDirectoryPath,
                  remoteDirectoryPath);

              kuduClient = KuduClient(
                  baseUriIdent,
                  userNameIdent,
                  passwordIdent);
              sourceDirectoryPath = "./publish/ReactChatDemoIdentities/";
              remoteDirectoryPath = "/site/wwwroot/";

              kuduClient.ZipUploadDirectory(
                  sourceDirectoryPath,
                  remoteDirectoryPath);
          });

Task("Default")
    .IsDependentOn("Deploy")
    .Does(() =>
          {
              Information("Your build is done :-)");
          });

RunTarget(target);
To get this script running locally, you need to set each of the environment variables in the current PowerShell session:
$env:KUDU_CLIENT_PASSWORD_APP = "super secret password"
# and so on...
If you only want to test the compile and publish stuff, just set the dependency of the default target to "Publish" instead of "Deploy". Doing this the deploy part will not run, you don't deploy in accident and you save some time while trying this.
Use CAKE in AppVeyor
On AppVeyor the environment variables are set in the UI. Don't set them in the YAML configuration, because they are not properly save and everybody can see them.
The most simplest appveyor.yml file looks like this.
version: 1.0.0-preview1-{build}
pull_requests:
  do_not_increment_build_number: true
branches:
  only:
  - master
skip_tags: true
image: Visual Studio 2017 Preview
build_script:
- ps: .\build.ps1
test: off
deploy: off
# this is needed to install the latest node version
environment:
  nodejs_version: "8.9.4"
install:
  - ps: Install-Product node $env:nodejs_version
  # write out version
  - node --version
  - npm --version
This configuration only builds the master and the develop branch, which makes sense if you use git flow, as I used to do. Otherwise change it to just use the master branch or whatever branch you want to build. I skip tags to build and any other branches.
The image is Visual Studio 2017 (preview only if you want to try the latest features)
I can switch off tests, because this is done in the CAKE script. The good thing is, that the XUnit test output, built by the test runs in CAKE , gets anyway published to the AppVeyor reports. Deploy is also switched off, because it's done in CAKE too.
The last thing that needs to be done is to install the latest Node.JS version. Otherwise the already installed pretty much outdated version is is used. This is needed to download the React dependencies and to run Webpack to compile and bundle the React app.
You could also configure the CAKE script in a way that test, deploy and build calls different targets inside CAKE. But this is not really needed and makes the build a little less readable.
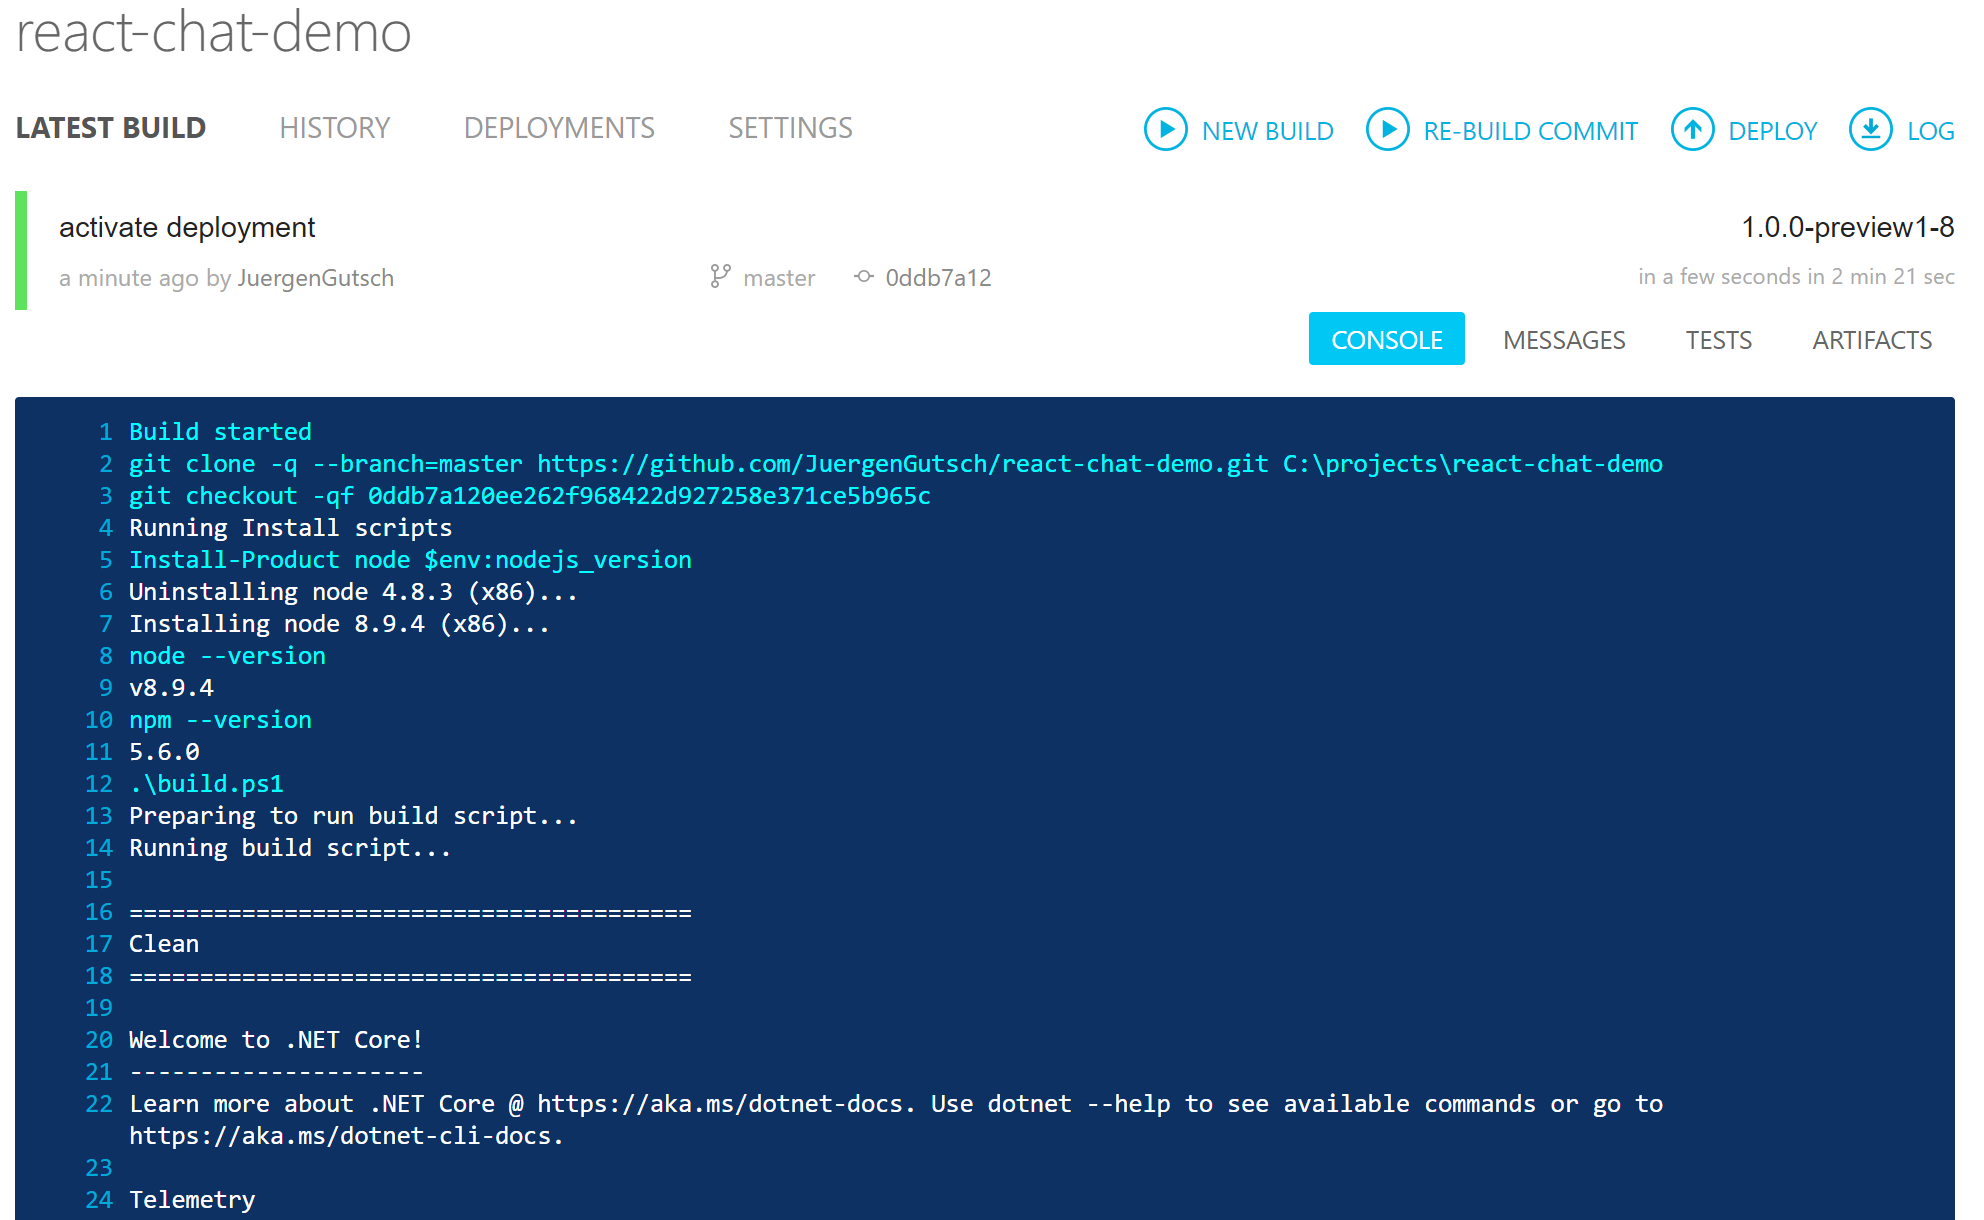
If you now push the entire repository to your repository on GitHub, you need to go to AppVeyor and to setup a new build project by selecting your GitHub repository. An new AppVeyor account is easily set up using an existing GitHub account. When the build project is created, you don't need to setup more. Just start a new build and see what happens. Hopefully you'll also get a green build like this:
Closing words
This post was finished one day after the Global MVP Summit 2018 on a pretty sunny day in Seattle

I spent two nights before the summit starts in Seattle downtown and the two nights after. Both times it was unexpectedly sunny.
I finish this series with this fifth blog post and learned a little bit about React and how it behaves in an ASP.NET Core project. And I really like it. I wouldn't really do a single page application using React, this seems to be much easier and faster using Angular, but I will definitely use react in future to create rich HTML UIs.
It works great using the React ASP.NET Core project in Visual Studio. It is great that Webpack is used here, because it saves a lot of time and avoids hacking around the VS environment.